Connect allows you to record video assignments using a webcam or other video camera connected to your computer. Speech assignments can be used for public speaking and other speech and video based assignments. The following tutorial shows you how to record and upload a speech assignment video. If you have problems using your webcam or video camera with the online video recording web site, check out the Troubleshooting seciton or visit Connect Customer Support for more assistance. Step #1
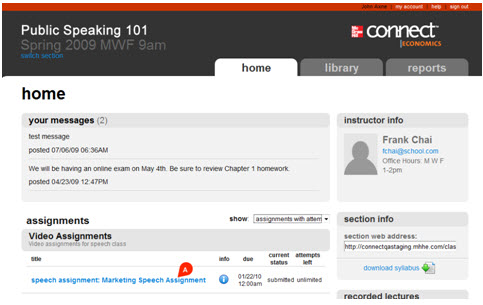
From the section home page select the speech assignment (A) from your list of assignments.
 <a onClick="window.open('/olcweb/cgi/pluginpop.cgi?it=jpg::::/sites/dl/free/0000065899/772725/studenthomepage.jpg','popWin', 'width=NaN,height=NaN,resizable,scrollbars');" href="#"><img valign="absmiddle" height="16" width="16" border="0" src="/olcweb/styles/shared/linkicons/image.gif"> (38.0K)</a> <a onClick="window.open('/olcweb/cgi/pluginpop.cgi?it=jpg::::/sites/dl/free/0000065899/772725/studenthomepage.jpg','popWin', 'width=NaN,height=NaN,resizable,scrollbars');" href="#"><img valign="absmiddle" height="16" width="16" border="0" src="/olcweb/styles/shared/linkicons/image.gif"> (38.0K)</a>
Step #2
From the pop-up menu, select upload video if you have already recorded your video and have the video file ready to upload. Click record video to use your webcam to record your video at this time. For this example we will use the record video feature. 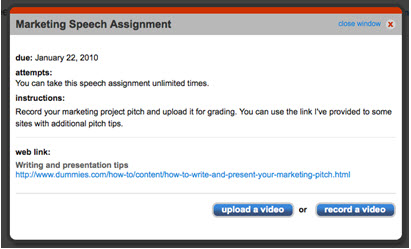 <a onClick="window.open('/olcweb/cgi/pluginpop.cgi?it=jpg::::/sites/dl/free/0000065899/772725/speechassignemnt_popup.jpg','popWin', 'width=NaN,height=NaN,resizable,scrollbars');" href="#"><img valign="absmiddle" height="16" width="16" border="0" src="/olcweb/styles/shared/linkicons/image.gif"> (32.0K)</a> <a onClick="window.open('/olcweb/cgi/pluginpop.cgi?it=jpg::::/sites/dl/free/0000065899/772725/speechassignemnt_popup.jpg','popWin', 'width=NaN,height=NaN,resizable,scrollbars');" href="#"><img valign="absmiddle" height="16" width="16" border="0" src="/olcweb/styles/shared/linkicons/image.gif"> (32.0K)</a>
Step #3
When the video recorder loads, you will be asked to allow Flash access to your webcam. Click Allow (A). 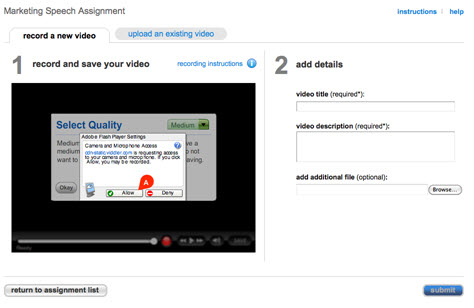 <a onClick="window.open('/olcweb/cgi/pluginpop.cgi?it=jpg::::/sites/dl/free/0000065899/772725/recordvideotabview.jpg','popWin', 'width=NaN,height=NaN,resizable,scrollbars');" href="#"><img valign="absmiddle" height="16" width="16" border="0" src="/olcweb/styles/shared/linkicons/image.gif"> (28.0K)</a> <a onClick="window.open('/olcweb/cgi/pluginpop.cgi?it=jpg::::/sites/dl/free/0000065899/772725/recordvideotabview.jpg','popWin', 'width=NaN,height=NaN,resizable,scrollbars');" href="#"><img valign="absmiddle" height="16" width="16" border="0" src="/olcweb/styles/shared/linkicons/image.gif"> (28.0K)</a>
Step #4
Next, select the quality of the video. Medium is the default if you have a typical broadband connection. If you have a slower internet connection you may need to change this to Low. We’ll stick with Medium, so click Okay (A). 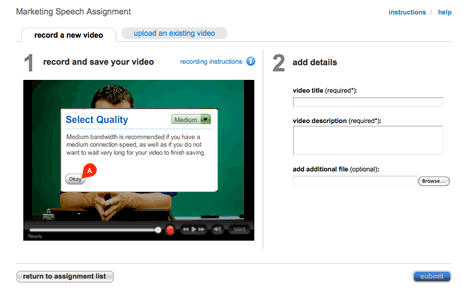 <a onClick="window.open('/olcweb/cgi/pluginpop.cgi?it=png::::/sites/dl/free/0000065899/772725/recordvideoSelectQuality.png','popWin', 'width=NaN,height=NaN,resizable,scrollbars');" href="#"><img valign="absmiddle" height="16" width="16" border="0" src="/olcweb/styles/shared/linkicons/image.gif"> (13.0K)</a> <a onClick="window.open('/olcweb/cgi/pluginpop.cgi?it=png::::/sites/dl/free/0000065899/772725/recordvideoSelectQuality.png','popWin', 'width=NaN,height=NaN,resizable,scrollbars');" href="#"><img valign="absmiddle" height="16" width="16" border="0" src="/olcweb/styles/shared/linkicons/image.gif"> (13.0K)</a>
Step #5
At this point you should see a live preview from your web cam in the video recorder. When you are ready to record, simple click the red Record button (A). Audio, Video options at the top of the preview area (B) allow you to control which audio and video source the video recorder is to use. If you have a different setup and are not getting audio or video to record, you may need to select a different source.  <a onClick="window.open('/olcweb/cgi/pluginpop.cgi?it=png::::/sites/dl/free/0000065899/772725/recordvideo_options.png','popWin', 'width=NaN,height=NaN,resizable,scrollbars');" href="#"><img valign="absmiddle" height="16" width="16" border="0" src="/olcweb/styles/shared/linkicons/image.gif"> (15.0K)</a> <a onClick="window.open('/olcweb/cgi/pluginpop.cgi?it=png::::/sites/dl/free/0000065899/772725/recordvideo_options.png','popWin', 'width=NaN,height=NaN,resizable,scrollbars');" href="#"><img valign="absmiddle" height="16" width="16" border="0" src="/olcweb/styles/shared/linkicons/image.gif"> (15.0K)</a>
Step #6
Click Record (A). The video recorder scrub bar display will change and the timer in the left corner (B) starts to indicate you are in recording mode. When you are done, click the Record button (A) again to stop recording.  <a onClick="window.open('/olcweb/cgi/pluginpop.cgi?it=png::::/sites/dl/free/0000065899/772725/recordvideoInProgress.png','popWin', 'width=NaN,height=NaN,resizable,scrollbars');" href="#"><img valign="absmiddle" height="16" width="16" border="0" src="/olcweb/styles/shared/linkicons/image.gif"> (16.0K)</a> <a onClick="window.open('/olcweb/cgi/pluginpop.cgi?it=png::::/sites/dl/free/0000065899/772725/recordvideoInProgress.png','popWin', 'width=NaN,height=NaN,resizable,scrollbars');" href="#"><img valign="absmiddle" height="16" width="16" border="0" src="/olcweb/styles/shared/linkicons/image.gif"> (16.0K)</a>
Step #7
After you stop the recording, the video is processed and will Connect will play your recording back automatically. You can use the scrub bar (A) and player controls (B) to review your video. If you need to re-record your video, click the record button again. Click the save button (C) when you are satisfied with your recording. 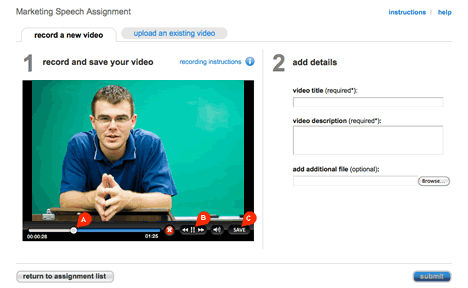 <a onClick="window.open('/olcweb/cgi/pluginpop.cgi?it=png::::/sites/dl/free/0000065899/772725/recordvideoReview.png','popWin', 'width=NaN,height=NaN,resizable,scrollbars');" href="#"><img valign="absmiddle" height="16" width="16" border="0" src="/olcweb/styles/shared/linkicons/image.gif"> (16.0K)</a> <a onClick="window.open('/olcweb/cgi/pluginpop.cgi?it=png::::/sites/dl/free/0000065899/772725/recordvideoReview.png','popWin', 'width=NaN,height=NaN,resizable,scrollbars');" href="#"><img valign="absmiddle" height="16" width="16" border="0" src="/olcweb/styles/shared/linkicons/image.gif"> (16.0K)</a>
Step#9
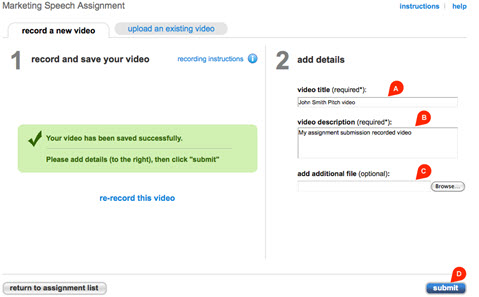
Once you save your video, it is processed and a message appears that your video was saved successfully. Next, add details for your speech assignment by entering a title (A) and description of your video (B). You can optionally add another file (C) such as a speech script, PowerPoint presentation or other assignment related document. Click submit (D) to submit your assignment.
 <a onClick="window.open('/olcweb/cgi/pluginpop.cgi?it=jpg::::/sites/dl/free/0000065899/772725/recordvideoStep2.jpg','popWin', 'width=NaN,height=NaN,resizable,scrollbars');" href="#"><img valign="absmiddle" height="16" width="16" border="0" src="/olcweb/styles/shared/linkicons/image.gif"> (27.0K)</a> <a onClick="window.open('/olcweb/cgi/pluginpop.cgi?it=jpg::::/sites/dl/free/0000065899/772725/recordvideoStep2.jpg','popWin', 'width=NaN,height=NaN,resizable,scrollbars');" href="#"><img valign="absmiddle" height="16" width="16" border="0" src="/olcweb/styles/shared/linkicons/image.gif"> (27.0K)</a>
Step#10
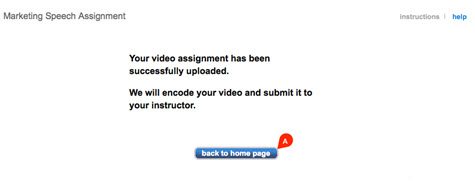
A message appears confirming your video assignment has been successfully uploaded. Connect will encode your video and notify your instructor it was submitted. Click back to home page to return to your section home page assignment list.
 <a onClick="window.open('/olcweb/cgi/pluginpop.cgi?it=jpg::::/sites/dl/free/0000065899/772725/recordvideoUploaded.jpg','popWin', 'width=NaN,height=NaN,resizable,scrollbars');" href="#"><img valign="absmiddle" height="16" width="16" border="0" src="/olcweb/styles/shared/linkicons/image.gif"> (12.0K)</a> <a onClick="window.open('/olcweb/cgi/pluginpop.cgi?it=jpg::::/sites/dl/free/0000065899/772725/recordvideoUploaded.jpg','popWin', 'width=NaN,height=NaN,resizable,scrollbars');" href="#"><img valign="absmiddle" height="16" width="16" border="0" src="/olcweb/styles/shared/linkicons/image.gif"> (12.0K)</a>
|