Vernier Luxury Suites: Inserting a Clip Art Image Barb Pietro, the accounting manager for Vernier Luxury
Suites, has begun a program for selling discounted meal tickets
to employees for use in the employee cafeteria. She has created
a sign to hang in the cafeteria and wishes to spice it up with
some clip art. Assume the role of Barb and perform the steps
she identifies. - Open the WD06XTRA01 data file and then save it as "meal
tickets sign" to your personal storage location.
- Let’s insert a clip art image in this document. With
the insertion point at the bottom of the document, do the
following:
CHOOSE: Insert, Picture, Clip Art - Barb wants a positive image for the bottom of the
sign:
SELECT: the text in the
Search text
text box TYPE: success CLICK: Search command button - In the Insert Clip Art task pane, locate the image
pictured in Figure 6.1 and then click the image. The image
should be displaying in the document.
- By referring to Figure 6.1, resize the clip art
image.
- Close the Insert Clip Art task pane and then deselect the
clip image by clicking in the first paragraph. Your screen
should now appear similar to Figure 6.1.
Figure 6.1 "meal tickets sign" document |  <a onClick="window.open('/olcweb/cgi/pluginpop.cgi?it=gif:: ::/sites/dl/free/0072471026/26780/WCh06_acq_Image1.gif','popWin', 'width=NaN,height=NaN,resizable,scrollbars');" href="#"><img valign="absmiddle" height="16" width="16" border="0" src="/olcweb/styles/shared/linkicons/image.gif"> (13.0K)</a> <a onClick="window.open('/olcweb/cgi/pluginpop.cgi?it=gif:: ::/sites/dl/free/0072471026/26780/WCh06_acq_Image1.gif','popWin', 'width=NaN,height=NaN,resizable,scrollbars');" href="#"><img valign="absmiddle" height="16" width="16" border="0" src="/olcweb/styles/shared/linkicons/image.gif"> (13.0K)</a>
|
- Save and then close the document.
Get File:  WD06XTRA01 (24.0K) WD06XTRA01 (24.0K)
Temporary Solutions: Creating a Business Diagram
Kim Megan, Marketing Director for Temporary Solutions, is
creating materials for an upcoming department meeting. Assume
the role of Kim as she prepares a Target diagram. - Create a new blank document.
- Create a target diagram in the document.
CHOOSE: Insert, Diagram SELECT: Target Diagram type CLICK: OK command button - Add an additional circle to the diagram.
CLICK: Insert Shape button on the Diagram toolbar - Using Figure 6.2 as a guide, add text to the diagram.
Format the text as Arial bold.
Figure 6.2 Target diagram with text | 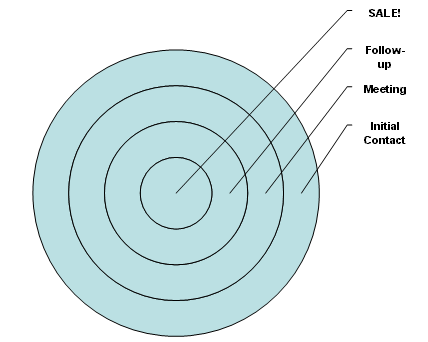 <a onClick="window.open('/olcweb/cgi/pluginpop.cgi?it=gif:: ::/sites/dl/free/0072471026/26780/WCh06_acq_Image2.gif','popWin', 'width=NaN,height=NaN,resizable,scrollbars');" href="#"><img valign="absmiddle" height="16" width="16" border="0" src="/olcweb/styles/shared/linkicons/image.gif"> (11.0K)</a> <a onClick="window.open('/olcweb/cgi/pluginpop.cgi?it=gif:: ::/sites/dl/free/0072471026/26780/WCh06_acq_Image2.gif','popWin', 'width=NaN,height=NaN,resizable,scrollbars');" href="#"><img valign="absmiddle" height="16" width="16" border="0" src="/olcweb/styles/shared/linkicons/image.gif"> (11.0K)</a>
|
- Apply new colors to the rings.
CLICK: on the center circle in the diagram CLICK: down arrow attached to the Fill Color button
( <a onClick="window.open('/olcweb/cgi/pluginpop.cgi?it=gif:: ::/sites/dl/free/0072471026/26780/WCh06_acq_Image3.gif','popWin', 'width=NaN,height=NaN,resizable,scrollbars');" href="#"><img valign="absmiddle" height="16" width="16" border="0" src="/olcweb/styles/shared/linkicons/image.gif"> (1.0K)</a> ) <a onClick="window.open('/olcweb/cgi/pluginpop.cgi?it=gif:: ::/sites/dl/free/0072471026/26780/WCh06_acq_Image3.gif','popWin', 'width=NaN,height=NaN,resizable,scrollbars');" href="#"><img valign="absmiddle" height="16" width="16" border="0" src="/olcweb/styles/shared/linkicons/image.gif"> (1.0K)</a> )
SELECT: Bright Green from the color palette Repeat these steps with the three rings, following the
example shown in Figure 6.3. Figure 6.3 Target diagram with color formatting | 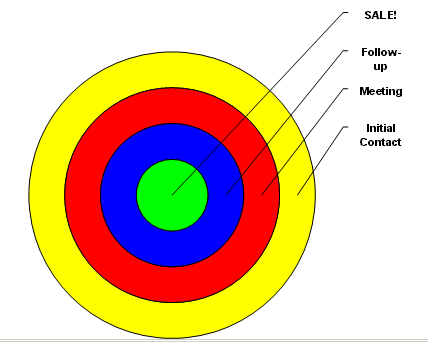 <a onClick="window.open('/olcweb/cgi/pluginpop.cgi?it=gif:: ::/sites/dl/free/0072471026/26780/WCh06_acq_Image4.gif','popWin', 'width=NaN,height=NaN,resizable,scrollbars');" href="#"><img valign="absmiddle" height="16" width="16" border="0" src="/olcweb/styles/shared/linkicons/image.gif"> (11.0K)</a> <a onClick="window.open('/olcweb/cgi/pluginpop.cgi?it=gif:: ::/sites/dl/free/0072471026/26780/WCh06_acq_Image4.gif','popWin', 'width=NaN,height=NaN,resizable,scrollbars');" href="#"><img valign="absmiddle" height="16" width="16" border="0" src="/olcweb/styles/shared/linkicons/image.gif"> (11.0K)</a>
|
- Add a 3-D effect to the diagram.
CLICK: on the center circle of the diagram PRESS: the Shift key and hold it down CLICK: the three rings of the diagram RELEASE: the Shift key CLICK: 3-D Style button ( <a onClick="window.open('/olcweb/cgi/pluginpop.cgi?it=gif:: ::/sites/dl/free/0072471026/26780/WCh06_acq_Image6.gif','popWin', 'width=NaN,height=NaN,resizable,scrollbars');" href="#"><img valign="absmiddle" height="16" width="16" border="0" src="/olcweb/styles/shared/linkicons/image.gif"> (0.0K)</a> ) on the Drawing
toolbar <a onClick="window.open('/olcweb/cgi/pluginpop.cgi?it=gif:: ::/sites/dl/free/0072471026/26780/WCh06_acq_Image6.gif','popWin', 'width=NaN,height=NaN,resizable,scrollbars');" href="#"><img valign="absmiddle" height="16" width="16" border="0" src="/olcweb/styles/shared/linkicons/image.gif"> (0.0K)</a> ) on the Drawing
toolbar SELECT: 3-D Style 5 Your diagram should now appear similar to Figure
6.4. Figure 6.4 "Sales Diagram" document | 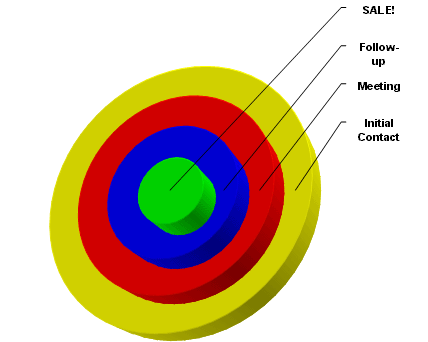 <a onClick="window.open('/olcweb/cgi/pluginpop.cgi?it=gif:: ::/sites/dl/free/0072471026/26780/WCh06_acq_Image7.gif','popWin', 'width=NaN,height=NaN,resizable,scrollbars');" href="#"><img valign="absmiddle" height="16" width="16" border="0" src="/olcweb/styles/shared/linkicons/image.gif"> (15.0K)</a> <a onClick="window.open('/olcweb/cgi/pluginpop.cgi?it=gif:: ::/sites/dl/free/0072471026/26780/WCh06_acq_Image7.gif','popWin', 'width=NaN,height=NaN,resizable,scrollbars');" href="#"><img valign="absmiddle" height="16" width="16" border="0" src="/olcweb/styles/shared/linkicons/image.gif"> (15.0K)</a>
|
- Save the document as "Sales Diagram" to your personal
storage location and close the document.
Jan Dice: Creating and Manipulating Draw Objects
Jan Dice has volunteered to create signs pointing to her
neighborhood’s annual yard sale. She decides that it would
be a good idea to use a prominent arrow to point the way.
Assume the role of Jan as she creates the sign using Draw
Objects. - Create a new blank document.
- Change the orientation of the document to landscape and
set the zoom to view the whole page.
- Add a Block Arrow AutoShape pointing to the right. Resize
to match the example in Figure 6.5.
Figure 6.5 Block Arrow AutoShape | 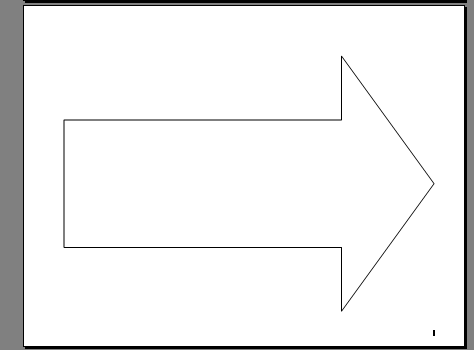 <a onClick="window.open('/olcweb/cgi/pluginpop.cgi?it=gif:: ::/sites/dl/free/0072471026/26780/WCh06_acq_Image8.gif','popWin', 'width=NaN,height=NaN,resizable,scrollbars');" href="#"><img valign="absmiddle" height="16" width="16" border="0" src="/olcweb/styles/shared/linkicons/image.gif"> (3.0K)</a> <a onClick="window.open('/olcweb/cgi/pluginpop.cgi?it=gif:: ::/sites/dl/free/0072471026/26780/WCh06_acq_Image8.gif','popWin', 'width=NaN,height=NaN,resizable,scrollbars');" href="#"><img valign="absmiddle" height="16" width="16" border="0" src="/olcweb/styles/shared/linkicons/image.gif"> (3.0K)</a>
|
- Format the arrow with a red fill.
- Add the text "NEIGHBORHOOD YARD SALE" to the arrow.
Format the text as 72 point Arial colored white.
- Use the yellow Adjustment Handle to tweak the shape of
the arrow so that it matches the example shown in Figure
6.6.
- Save the document as "Yard Sale Sign" and close it.
Figure 6.6 "Yard Sale Sign" document | 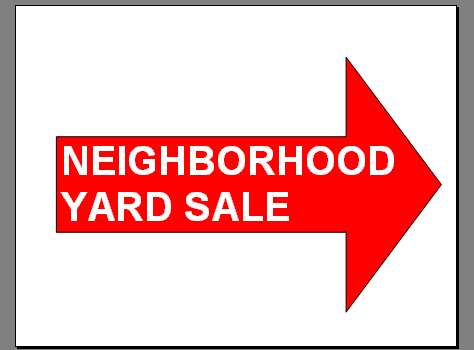 <a onClick="window.open('/olcweb/cgi/pluginpop.cgi?it=gif:: ::/sites/dl/free/0072471026/26780/WCh06_acq_Image9.gif','popWin', 'width=NaN,height=NaN,resizable,scrollbars');" href="#"><img valign="absmiddle" height="16" width="16" border="0" src="/olcweb/styles/shared/linkicons/image.gif"> (6.0K)</a> <a onClick="window.open('/olcweb/cgi/pluginpop.cgi?it=gif:: ::/sites/dl/free/0072471026/26780/WCh06_acq_Image9.gif','popWin', 'width=NaN,height=NaN,resizable,scrollbars');" href="#"><img valign="absmiddle" height="16" width="16" border="0" src="/olcweb/styles/shared/linkicons/image.gif"> (6.0K)</a>
|
|


 2002 McGraw-Hill Higher Education